The Polaroid camera effect is considered as one of the best action to add a framework for a set of photos, now that's made easy with new Photoshop elements. In this tutorial we will look how to make a collage of photos look like Polaroids. In simple words throughout the tutorial we will be trying to add many Polaroid frames inside a single picture and finally get a Collage of Pictures.
Let's move to the tutorial.
Let's move to the tutorial.

1st Step : Open up the image by going File/ Open.

2nd Step : Create a new Layer by Layer/ New /Layer or simply as I did on the image.

3rd Step : Grab the Rectangular marquee tool by pressing M.
4th Step : Cut out a square selection in the image as I did.


6th Step : Now press Alt + Delete. It should be something like this.

7th Step : Create a new Layer, when you create press Ctrl to place it under the original Layer.

8th Step : Go to Select/ Transform Selection.

9th Step : Now you can drag out the selection to make it look like a polaroid photo.

10th Step : Now press Ctrl + delete then Ctrl + d.

.

12th Step : You should get a dialog box like this then you must adjust the setting to Opacity 40 % and Angle 120 degress and click Ok.

13th Step : Now Highlight Layer 1 and Layer by holding Ctrl and clicking on both the layers.

14th Step : Press Ctrl + t rotate the layers.

15th Step : Now click only on Layer 1. When you’re clicking press ctrl to select the layer inside. If you can’t make a selection inside by ctrl clicking just take the Magic wand tool and make a selection.

After doing it should be selected like this.

16th Step : Now delete the Layer 1 by right clicking on the Layer and Delete Layer.

Since you have selected the inside Layer after deleting the pic should be like this.

17th Step : Click on background and press ctrl + j and create layer 3.

18th Step : Drag Layer 3 above Layer 2.

After doing you
will be able to get the First Polaroid photo montage.

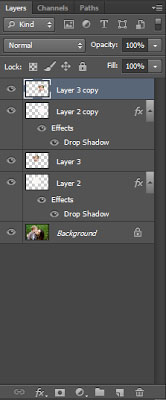
19th Step : Now to take the other Polaroid photos, highlight Layer 2 and Layer 3 by pressing Ctrl and duplicate those 2 Layers.

20th Step : After you duplicate those 2 Layers, Grab the Move tool by tool bar or simply press V.
21st Step : Now take the Copy to a new Location. If you want you can rotate the new copy by pressing Ctrl + t.

22nd Step : Now again as I told, click only on Layer 3 copy and make a selection inside the photo. You can do it by Ctrl + clicking on the image or just grab the Magic wand tool and make the selection.
Below picture shows the second image Layer got selected inside the Photo.

23rd Step : Now again delete the Layer 3 copy. You should get something like this.

24th Step : Now click on Background and Ctrl + J and place it above Layer 2 copy.

Continue the above process to completely get filled with Polaroid Photos. Don’t get confused with the Layers. First duplicate those 2 top layers and place it below the Background and move the new selection to a new location and transform it by pressing Ctrl + t. And then click on the above Layer which you selected before and make a selection inside, delete it and click on background , Ctrl + J and place it above the Layer which you selected before.
25th Step
: After doing all the process you should get a image like this.

26th Step : You can click on the Eye icon to only views the selected polaroid photos not the others.

27th Step : Now select all the Layers by Shift + bottom Layer to the top Layer and Ctrl + E. When you merge all the Layers make sure not to click on Background.

28th Step : Find a good background or Texture from a website and Open it.


30th Step
: Now go to the Poloroid document and create a new Layer while you create press
Ctrl.

Make sure the Background is not visible.

31st Step : Click on Layer 5 and Adjustment Layer icon and choose Pattern.

Depending on the Poloroid image you have you can adjust the scale you want. I selected 91.

32nd Step : Ctrl +Click on those 2 pattern Layers and right click , Merge visible.

33rd Step : Now Save the Final image by going to File /Save As...

That's it you are done, you have successfully added Polaroid filters to the Pictures and turned them into a Collage of Polaroid Photos. If you have any Queries please leave it in the comment section.
No comments:
Post a Comment