Today we are going to learn the Age progression tutorial in Photoshop. I’ll be using Photoshop CS6 . This will work in almost all the versions of Photoshop. You can see how you look like in your 60s and 70s. Its very simple and takes less time for you to do this. So let’s get started..
So let’s get started..
So let’s get started..

1st Step : Open the Image.
Open up the Image which you are going to do a Age Progression by Pressing
File > Open or just by Pressing Ctrl + O.
Open up the Image which you are going to do a Age Progression by Pressing
File > Open or just by Pressing Ctrl + O.
 |
| Image Credits Pixabay.com |

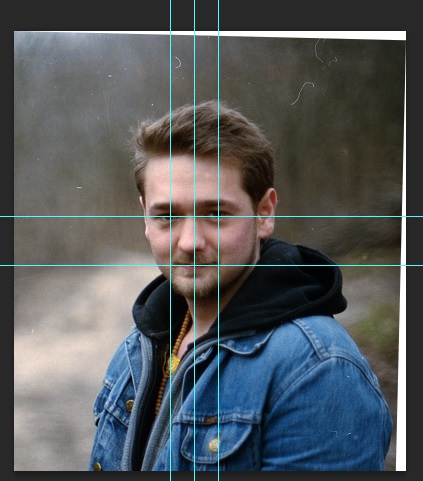
2nd Step : Insert Guide Lines.
You need to insert Guidelines to the Image. For that go to View > Insert Guideline. Make sure it is Vertical selected and has Position 0 in.

3rd Step : Grab the Move Tool.
Take the Move tool from the Tool Bar or just by Pressing V.

Take the Move tool from the Tool Bar or just by Pressing V.

4th Step : Move the Guidelines.
After taking the Move tool move the Guidelines such that it is in the Centre of the Nose.

After taking the Move tool move the Guidelines such that it is in the Centre of the Nose.

Press Ctrl + A and then Ctrl + T to adjust the Image. Adjust the Image until you get a perfect alignment. Then Press Enter key.

6th Step : Deselect the Selection
Deselect the Selection by going to Select > Deselect or just by pressing Ctrl + D.
Deselect the Selection by going to Select > Deselect or just by pressing Ctrl + D.

7th Step : Insert 2 other Guidelines.
Insert 2 other Guidelines by going to View > New Guidelines. Both should Vertical Selected and has Position 0 in in it. Make sure that both he Guidelines runs between the eyes.
Insert 2 other Guidelines by going to View > New Guidelines. Both should Vertical Selected and has Position 0 in in it. Make sure that both he Guidelines runs between the eyes.

8th Step : Insert a Horizontal Guideline.
Insert an other Guideline by Pressing View > New Guideline. This time it should be Horizontal and has Position 0 in in it.
Insert an other Guideline by Pressing View > New Guideline. This time it should be Horizontal and has Position 0 in in it.

9th Step : Move the Guideline.
Take the Move Tool and move the Guideline such that it runs through the mouth.
Take the Move Tool and move the Guideline such that it runs through the mouth.

10th Step: Horizontal Guideline through the Eyes.
Repeat the same procedure for placing a Horizontal Guidelines which runs through both the Eyes.
Repeat the same procedure for placing a Horizontal Guidelines which runs through both the Eyes.
Open the other image by going to File > Open.

 |
| Image Credits Pixabay.com |
12th Step : Take the Polygonal Lasso Tool.
Grab the Polygonal Lasso Tool from the Tool Bar.

13th Step : Make a Freehand Selection.
After taking out the Lasso Tool make a Freehand Selection as I have done in the Picture.

14th Step : Copy the Selection.
Copy the Freehand Selection you made by Pressing Edit > Copy or just by Pressing Ctrl + C.
Copy the Freehand Selection you made by Pressing Edit > Copy or just by Pressing Ctrl + C.

15th Step : Paste it.
Paste it in the other image by Pressing Edit > Paste or just by Pressing Ctrl + V.

16th Step : Adjust the Image.
After Pasting the Image Press Ctrl + T to free transform and adjust the Picture until it perfectly fits to the Guidelines.
After Pasting the Image Press Ctrl + T to free transform and adjust the Picture until it perfectly fits to the Guidelines.

17th Step : Decrease the Opacity.
On the bottom right corner you can see the Opacity levels. Decrease it until it perfectly matches.
On the bottom right corner you can see the Opacity levels. Decrease it until it perfectly matches.

18th Step : Remove the Guidelines.
Remove all the Guidelines by Pressing View > Clear Guidelines.

19th Step : Take the Eraser Tool.
Grab the Eraser tool by Pressing the Eraser Icon from the Tool Bar or just by Pressing E. With the Eraser tool remove all the Unwanted Areas. Make sure to Erase the Important Areas such as Eyes, Nose and Mouth.
Grab the Eraser tool by Pressing the Eraser Icon from the Tool Bar or just by Pressing E. With the Eraser tool remove all the Unwanted Areas. Make sure to Erase the Important Areas such as Eyes, Nose and Mouth.
20th Step : Identifying Images.
so that it will be easy for the Erasing Process.

21st Step : Merge the Layers.
Now you re almost done. Click on all the Layers and Right Click Press Merge Visible.

Now you re almost done. Click on all the Layers and Right Click Press Merge Visible.

22nd Step : Save the Final Image.
Save up the Final Image by Pressing File > Save As....
Save up the Final Image by Pressing File > Save As....

Now you are done. You have successfully added Age Progression Effect to your Picture. If you have any queries please leave it in the comment section.
No comments:
Post a Comment