How do you think you look like when you switch faces between your most liked celebrity or any other person ? That's going to be interesting.
In this tutorial we are going to see how to use face swap in Photoshop. For the convenience of the user it is always advisable to find an image for face switch which matches the skin tone of the person you are going to edit. The large difference in skin tone can bring a color imbalance in the final output.
Now lets begin,
Now lets begin,
1st Step : Open up the image.
Open the Image which you are going to do Face Swap by Clicking File > Open
or Just by pressing Ctrl + O.
 |
| Image Credits Pixabay.com |
2nd Step : Duplicate the layer.
Now on the bottom right corner you can see the background icon. Right Click on
that and Press Duplicate Layer. Keep the name as Background Copy and Press Ok
3rd Step : Open the 2nd Image.
Open the Other Image which you are going to replace the face by Going to
File > Open.
File > Open.
4th Step : Do a Freehand Selection.
After Opening the 2nd Image grab the Polygonal Lasso Tool from the Tool Bar
and do a Freehand Selection as I did in the below image.
 |
| Image Credits Pixabay.com |
5th Step : Copy the Selection.
Copy the Freehand Selection you made by Pressing Edit > Open or just by Pressing Ctrl + C.
7th Step : Adjust the Pasted Picture.
Press Ctrl + t , adjust the face until it perfectly matches and apply it. Set the Opacity to Below 50%.
Press Ctrl + t , adjust the face until it perfectly matches and apply it. Set the Opacity to Below 50%.
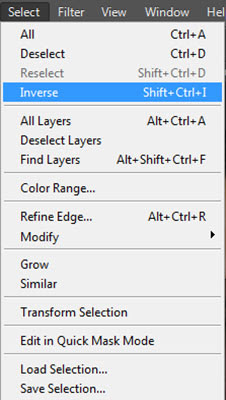
8th Step : Select the Pixels on the Pasted Image and Inverse it.
Right click on the layer icon and and Select Pixels then Go to Select > Inverse or Press Shift + Ctrl + I.
9th Step : Expand the Image.
Now Go to Select > Modify > Expand and Expand by any number between 5
and 10. And Press Ok.
10th Step : Inverse the Image.
Inverse the image again by Pressing Select > Inverse or by Pressing
Shift + Ctrl + I.
11th Step : Make the Backgroud Copy Layer visible.
Make only the Backgroud Copy Layer visible by Clicking on the small eye icon and press Del. This should delete the pasted image.
Deselect the Freehand Selection by Pressing Select > Deselect or Press
Ctrl + D.
Ctrl + D.
13th Step : Make the Background Copy and Layer 1 visible.
Now make sure that both Background Copy and Layer 1 are visible by Clicking on the small eye icon.
Now make sure that both Background Copy and Layer 1 are visible by Clicking on the small eye icon.
14th Step : Select Background Copy and Layer 1.
Press Ctrl and left click on both Background copy and Layer 1 to select both.
Press Ctrl and left click on both Background copy and Layer 1 to select both.
Add Panorama effect to the Image by Pressing Edit > Auto blend layer > Panorama and click Ok.
16th Step : Merge the 3 Layers.
Now combine all the 3 layers by holding Ctrl and right clicking all 3 layers and Press Merge Visible.
Now combine all the 3 layers by holding Ctrl and right clicking all 3 layers and Press Merge Visible.
.
17th Step : Make both the Layers Visible.
Press on both small eye icons on the Layers and Make sure that both the layers are visible.
18th Step : Now Save the Final image by going to File > Save As... or
by Pressing Shift + Ctrl + S.
Press on both small eye icons on the Layers and Make sure that both the layers are visible.
18th Step : Now Save the Final image by going to File > Save As... or
by Pressing Shift + Ctrl + S.


Okay, I am using photoshop CS6 and I can't see the auto blend layer..Any help?
ReplyDeleteYour article provide me huge knowledge related to Cliping path services.
ReplyDeleteThanks for sharing this post.professional photoshop services