Wanted to transfer a portion of your photos into small particles ? Now it is an easy action with the New Photoshop elements. In this Photoshop tutorial we will look how to add Dispersion Effect to your pictures. You need to have considerable patience as you are going to deal with many layers and spend some time with Brushes.
Now lets get started,
Now lets get started,

Open the Background Image by Pressing File > Open or just create a White Background Pressing File > New or Ctrl + N.

2nd Step : Create a new layer.
Make a Layer to Background Image by Pressing the Small layer icon on the bottom right corner.

3rd Step : Open the Main Image.
Open up the picture you’re going to do the dispersion effect.
Open up the picture you’re going to do the dispersion effect.

 |
| Image Credits Pixabay.com |
4th Step : Make a Freehand Selection.
Make a selection around the image with Quick selection tool or Polygonal lasso tool. I recommend to use Quick selection tool because its quick and easy.

5th Step : Copy the Image.
Cope the Image by Pressing Edit > Copy.
Cope the Image by Pressing Edit > Copy.

6th Step : Paste the Image.
Paste it on the Background which was opened earlier. Make sure to click on the Layer not the Background. After Pasting Press Ctrl + t to free transform.
Paste it on the Background which was opened earlier. Make sure to click on the Layer not the Background. After Pasting Press Ctrl + t to free transform.

When you have clicked on Layer 1 make copies of it by pressing Ctrl + J few times.

8th Step : Grab the Move Tool.
Click on the Layer 1 copy and Select the Move tool from the Tool bar
or by just pressing press V.
or by just pressing press V.
9th Step : Move the Image.
Just move the Copied image either to right or left. Make sure its behind the Original image.

10th Step : Repeat the same thing to all the Layer Copies. It Should be behind one and another.


11th Step : Create a layer mask for all the Layer copies.
Click on the small Icon on bottom right corner and Create a Layer mask for all the Layer Copies.

12th Step : Hide the Layer Copies.
And now by clicking on the second Icon which is highlighted on the photo Press Ctrl + I. This will hide the Layer Copies. Use this for all the Copies of Layer.

Now just create a White layer mask for Layer 1 by Pressing the small Icon on the bottom right corner . Don’t press Ctrl + I on that layer.

Click on Layer 1 and Select Brush tool from Tool Bar. and start painting as I did. As I told earlier you can download a good splatter brush from Google. Make sure the color selected is Black on the brush.

NOTE : When coloring use different types of brushes to get a good look and also if you done a mistake you can use Ctrl + z to delete it. Make sure to toggle the brush panel to the the angle and others.
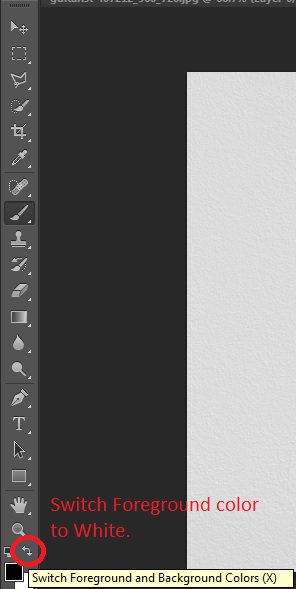
15th Step : Coloring On Layer Copies.
Now click on Layer 1 copy and Start Coloring again. Make Sure to Flip the Color from the Tool Bar. Repeat this for all the Layer Copies.
Now click on Layer 1 copy and Start Coloring again. Make Sure to Flip the Color from the Tool Bar. Repeat this for all the Layer Copies.

Now you are almost done. Press and hold Ctrl and Click on all three layers. Then Right Click and press Merge Visible.

17th Step : Save the Final Image.
Now Save the Final image by going to File > Save As...
Now Save the Final image by going to File > Save As...

That's it you are done, you have successfully added Dispersion effect to your Picture. If you have any Queries please leave it in the comment section.
No comments:
Post a Comment